Introduction
Welcome to the Fendous Customer Relationship Management (CRM)! This user manual will guide you through all the features and functionalities of the Fendous CRM platform, It helps you keep track of all your customers and sales in one place. Whether you're the boss, an employee, or a team leader, Fendous has tools to make your job easier.
Getting Started
1. System Requirements
To use Fendous CRM, ensure your system meets the following requirements:
- A modern web browser (Chrome, Firefox, Edge, Safari etc.)
- Internet connection
2. Account Creation
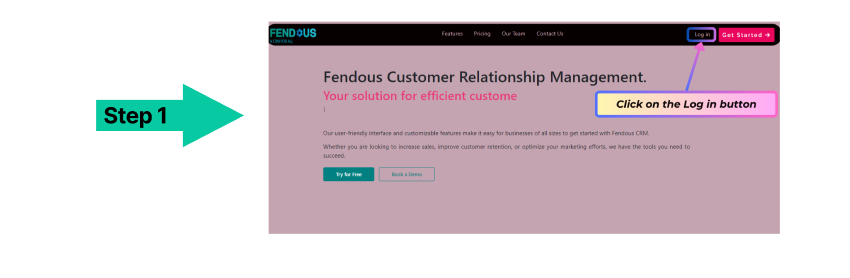
1. Open your web browser and visit “fendous.in”
2. Look for a "Get started" button located at the top right corner of the page.
3. Complete all required fields such as your name, business email, your email, password, select plan, plan amount, credit card number, expiration date, security code then click on Get Started button
4. You need to confirm the terms of service and privacy policy to create your account.

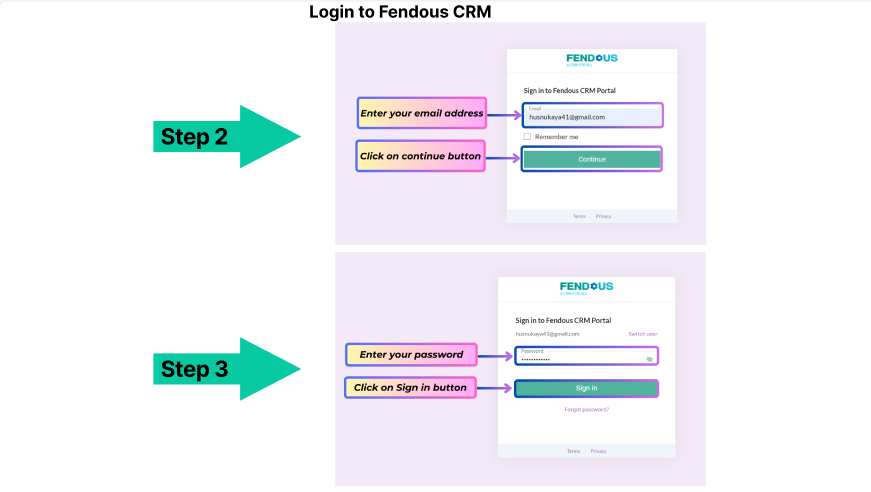
Login to Fendous CRM
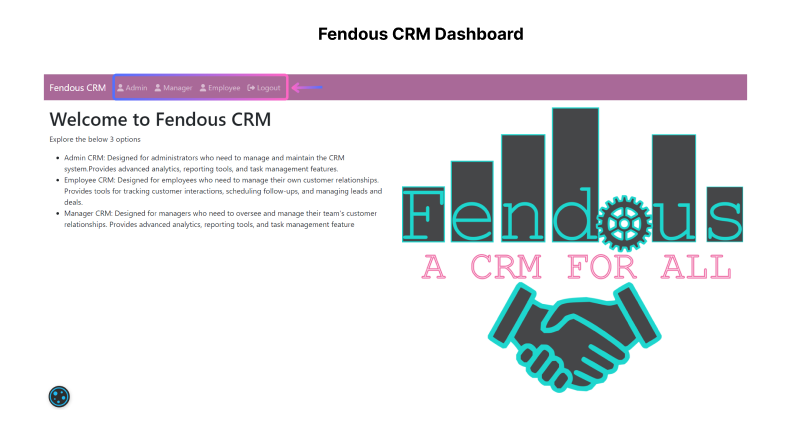
Dashboard Overview
Upon logging in, you will be directed to the dashboard. The dashboard provides a summary of Admin, Manager, and Employee CRM activities. It includes:
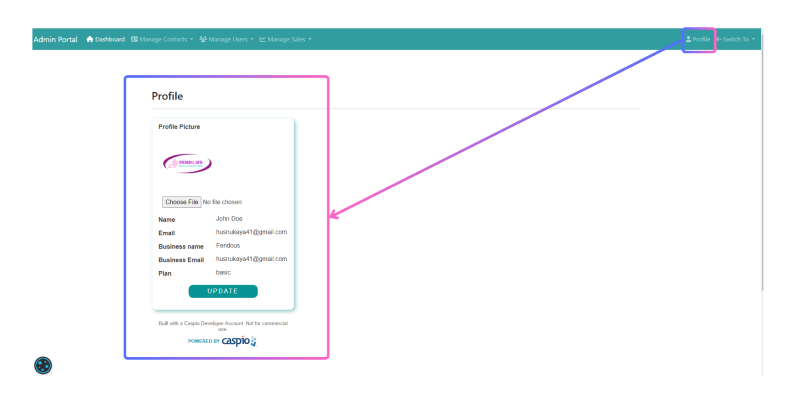
Profile Settings
- 1. Click on Profile.
- 2. Update your personal information and click UPDATE button
User Roles
Admin: Responsible for managing the entire CRM system, including user accounts, data, and system settings. Provides advanced analytics and reporting tools.
Manager:Oversees and manages a team's customer relationships. Has access to team performance metrics and tools for managing tasks and customer interactions.
Employee: Focuses on individual customer relationships. Manages leads, deals, and customer interactions.
Admin CRM
Admin Dashboard :The Admin Dashboard offers a customizable view of your CRM data. You can filter information based on various criteria such as region, employee, deal stage, date, and the dashboard will visually represent the results as graphs and charts. This gives you a quick and easy way to understand your CRM's performance
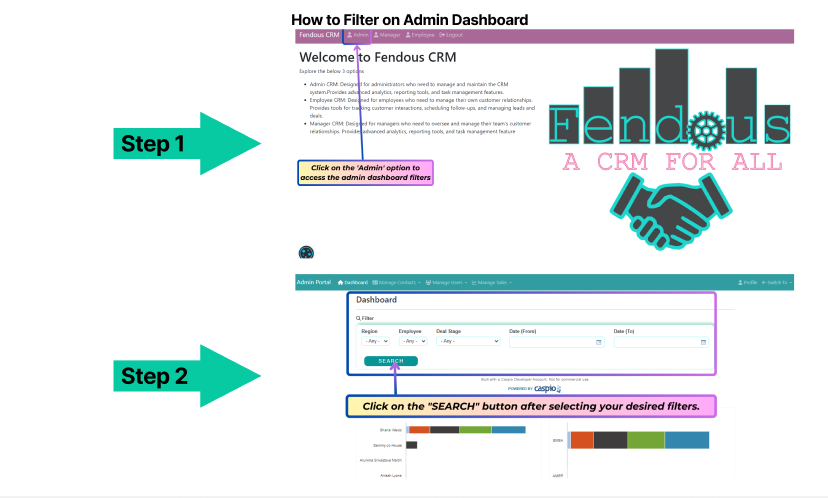
How to Filter on Admin Dashboard
You can customize the data by using the options in the Filter section.
1. Click on the "Dashboard" tab. This will take you to the main overview of your CRM data.
2. Region: You can select all regions or a specific region (e.g., AMER: Americas, APAC: Asia Pacific, EMEA: Europe, Middle East and Africa).
3. Employee: You can select all employees or a specific employee.
4. Deal Stage: You can filter deals based on their stage (e.g., Any, Appointment Scheduled, Needs Confirmed, Demo Given, Fit Established, Proposal Sent, Agreement Reached, Closed Won, Closed Lost).
5. Date Range: You can specify a date range to view data for a specific period.
6. Click on the "SEARCH" button after selecting your desired filters. You will see the results displayed in various charts and graphs, such as bar charts, line graphs, and pie charts.
Admin CRM
Manage Contacts
Manage Contacts offers admin users full control over the Fendous CRM's contact list. Add, edit, or delete contacts to keep information correct and current.
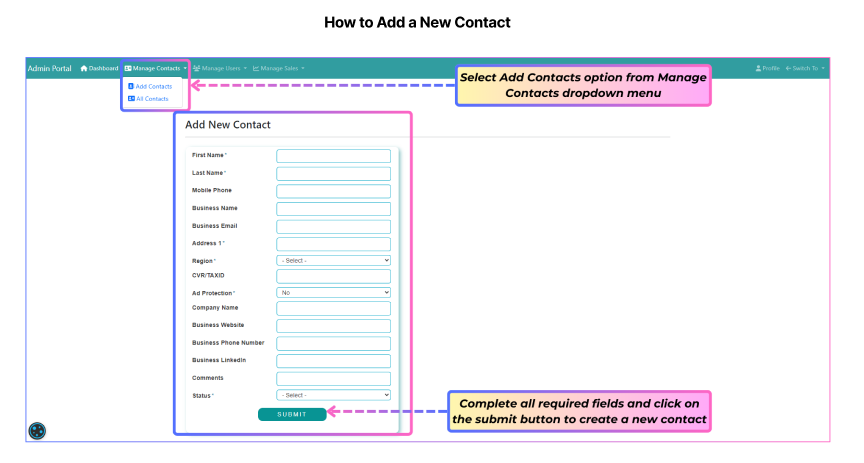
How to Add a New Contact
1. Navigate to Manage Contacts:
2. Add a New Contact:
3. Fill in the Ad New Contact Form: A form will appear where you need to enter the contact details:
- First Name and Last Name: Enter the contact’s first and last name.
- Mobile Phone: Enter the contact's mobile number.
- Business Name and Business Email: Enter the contact's business name and email address.
- Address: Fill in the contact's address.
- Region: Select a specific region from the dropdown menu (e.g., AMER: Americas, APAC: Asia Pacific, EMEA: Europe, Middle East and Africa).
- CVR/TAXID: Enter the contact's tax identification number.
- Ad Protection: Choose "Yes" or "No" depending on whether the contact needs ad protection.
- Company Name: Enter the contact's company name.
- Business Website: Add the contact's business website.
- Business Phone Number and Business LinkedIn: Enter the business phone number and LinkedIn profile.
- Comments: Add any additional notes or comments.
- Status: Select the current status of the contact from the dropdown menu. Options include: Prospect (potential customer), Disqualified (not a good fit), Customer (made a purchase), Cancelled (deal cancelled).
4. Submit the Form: Click on the submit button to add the contact.
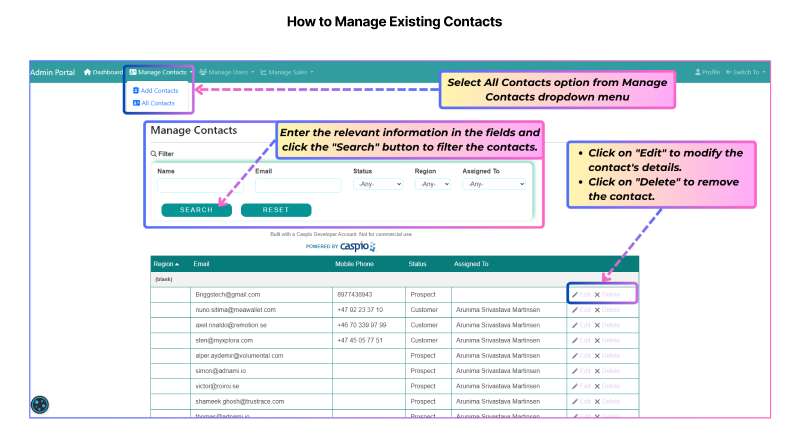
How to Manage Existing Contacts
1. Access the Manage Contacts Page:
2. Search for a Contact:
3. Edit or Delete a Contact:
Admin CRM
Manage Users
The Manage Users menu allows you to manage all the users within the CRM System. Through this menu, you can add new users, update existing user information, or delete users.
It provides two main options:
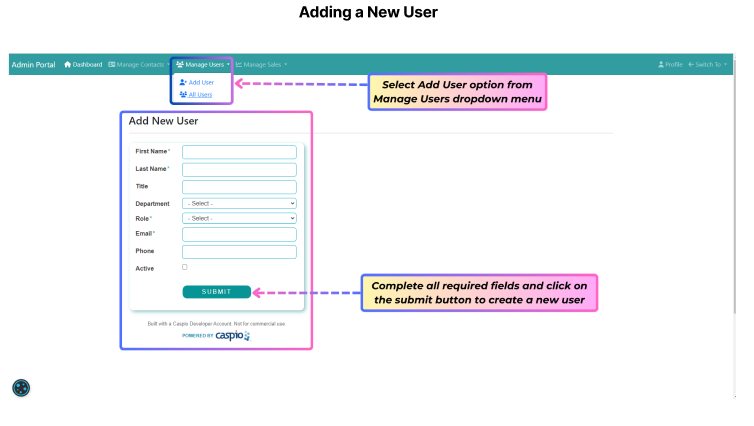
Adding a New User
1. Navigate to Manage Users: On the top menu, click on "Manage Users."
2. Access the Add User Form: Select "Add User from the manage users dropdown menu. This will bring you to the "Add New User" form.
3. Fill Out the User Details:
4. Submit the Form: Click the "Submit" button located at the bottom of the form to add the user to the CRM system.
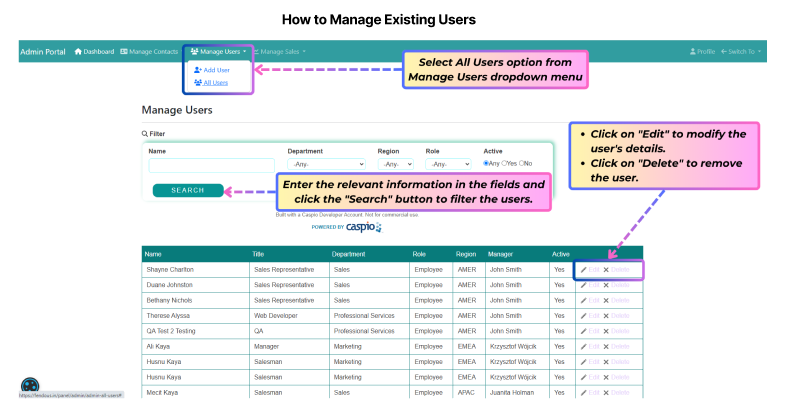
How to Manage Existing Users
1. Access the Manage Users Page:
2. Search for a user:
3. Edit or Delete a User:
Admin CRM
Manage Sales
Manage Sales module allows you to oversee various aspects of your sales process. Here's a breakdown of each tab:
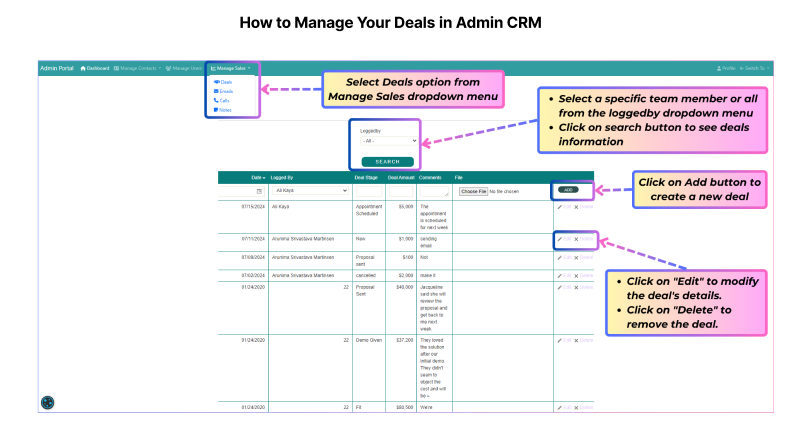
How to Manage Your Deals in Admin CRM
The Deals tab helps you keep track of all your potential sales. It shows you where each deal is in the sales process, how much it's worth, and lets you add notes about each one.
Here's how it works:
1. Getting to Deals: Click on "Manage Sales" at the top of the page, then select "Deals" from the dropdown menu.
2. Viewing Your Deals: You'll see a list of all your deals. Each row represents a different deal.
3. Filtering Your Deals: You can use the Loggedby dropdown menu above the deals table to filter the deals you want to see. For example, you can choose to only see deals logged by a specific team member.
4. Adding a New Deal: Fill in all required fields in the first row and then click on the "ADD" button.
5. Updating a Deal: To change the details of an existing deal, click the "Edit" button located at the end of the deal row.
6. Deleting a Deal: To remove a deal completely, click the "Delete" button located at the end of the deal row.
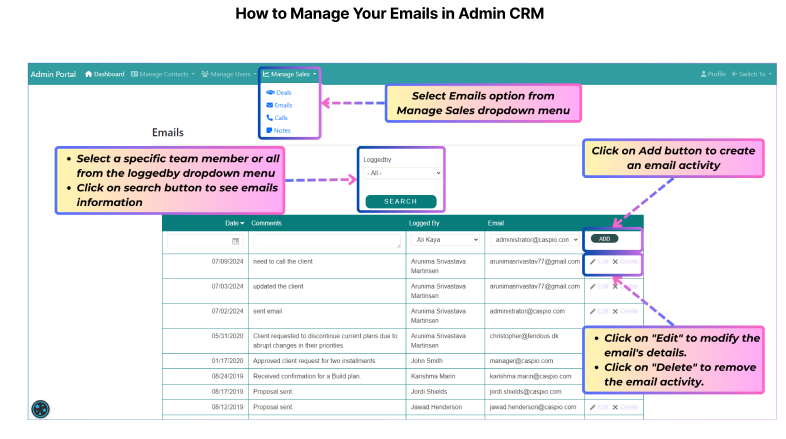
How to Manage Your Emails in Admin CRM
The Emails tab provides a record of email activities related to your sales deals.
Here's how it works:
1. Getting to Emails: Click on "Manage Sales" at the top of the page, then select "Emails" from the dropdown menu.
2. Viewing Your Emails: Fill in all required fields in the first row and then click on the "ADD" button.
3. Filtering Emails: You can use the "Logged By" dropdown to filter emails by user. For example, view only emails logged by a specific team member.
4. Adding an Email Activity: Fill in all required fields in the first row and then click on the "ADD" button.
5. Updating an Email Activity: Click the "Edit" button at the end of the email row to make your changes.
6. Deleting an Email Activity: Click the "Delete" button at the end of the email row.
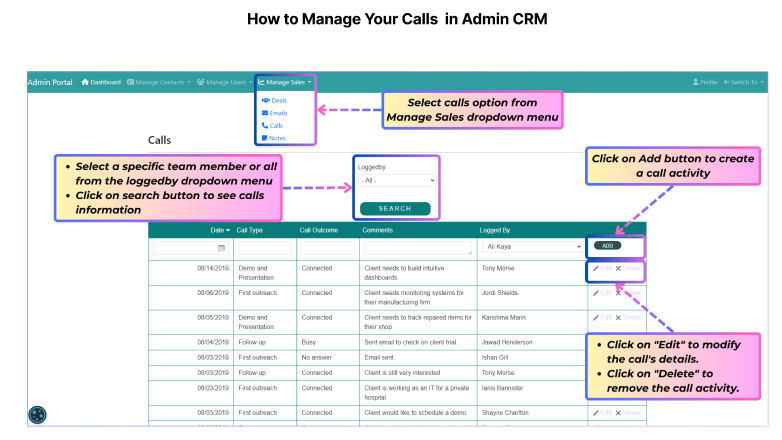
How to Manage Your Calls in Admin CRM
Admin CRM's Calls section lets you record, track, and manage sales call details, improving follow-up and boosting sales.
Here's how it works:
1. Getting to Calls: Click on "Manage Sales" at the top of the page, then select "Calls" from the dropdown menu.
2. Viewing Your Calls:You'll see a list of all your calls associated with your sales deals. Each row represents a different call activity.
3. Filtering Calls: You can use the "Logged By" dropdown to filter calls by user. For example, view only calls logged by a specific team member.
4. Adding a Call Activity: Fill in all required fields in the first row and then click on the "ADD" button.
5. Updating a Call Activity: Click the "Edit" button at the end of the call row to make your changes.
6. Deleting a Call Activity: Click the "Delete" button at the end of the call row.
How to Manage Your Notes in Admin CRM
The Notes tab within Admin Manage Sales allows you to view, search, and manage all notes related to your sales activities.
Here's how it works:
1. Getting to Notes: Click on "Manage Sales" at the top of the page, then select "Notes" from the dropdown menu.
2. Viewing Your Notes: You'll see a list of all your notes associated with your sales deals. Each row represents a different note activity.
3. Filtering Notes: You can use the "Logged By" dropdown to filter notes by user. For example, view only notes logged by a specific team member.
4. Adding a Note Activity: Fill in all required fields in the first row and then click on the "ADD" button.
5. Updating a Note Activity: Click the "Edit" button at the end of the note row to make your changes.
6. Deleting a Note Activity: Click the "Delete" button at the end of the note row.

Manager CRM
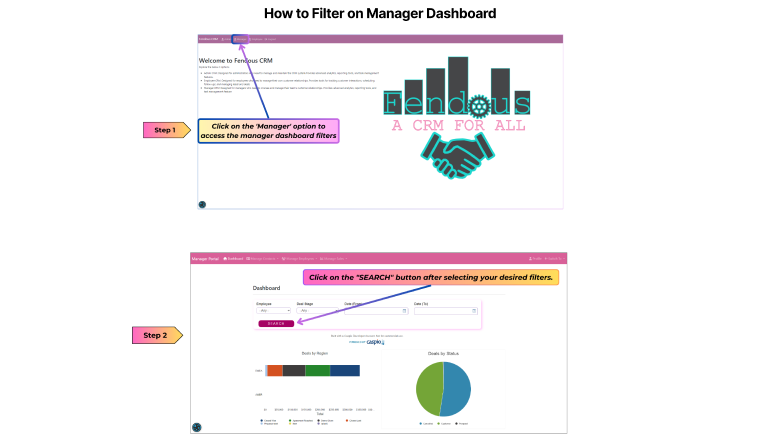
Manager Dashboard : The Manager Dashboard provides a visual overview of your team's sales performance, allowing you to track key metrics and identify trends. You can filter the displayed information by region, employee, deal stage, and date range.
How to Filter on Manager Dashboard
You can customize the displayed data by applying filters at the top of the dashboard:
1. Click on the "Dashboard" tab. This will take you to the main overview of your CRM data.
2. Employee: You can select "Any" to view data for all employees or select a specific employee from the Employee dropdown menu.
3. Deal Stage: You can filter deals based on their stage (e.g., Any, Appointment Scheduled, Needs Confirmed, Demo Given, Fit Established, Proposal Sent, Agreement Reached, Closed Won, Closed Lost).
4. Date (From): You can specify the starting date to view data for a specific period.
5. Date (To): You can specify the ending date to view data for a specific period.
Manager CRM
Manage Contacts
Manage Contacts offers manager users full control over the Fendous CRM's contact list. Add, edit, or delete contacts to keep information correct and current.
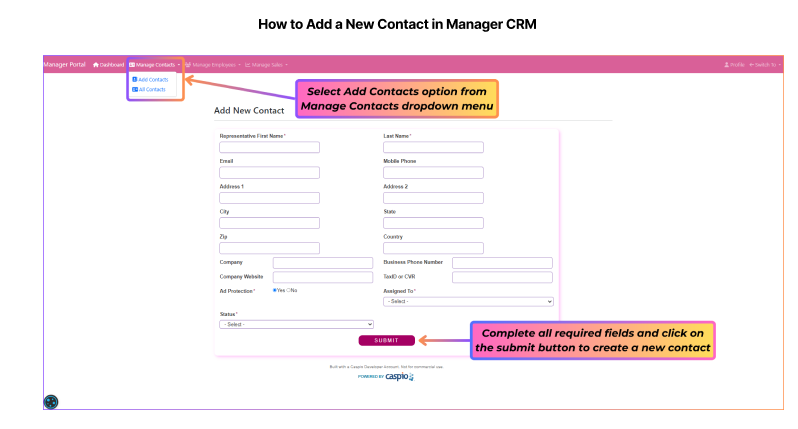
How to Add a New Contact in Manager CRM
1. Navigate to Manage Contacts:
2. Add a New Contact:
3. Fill in the Add New Contact Form: A form will appear where you need to enter the contact details:
4. Submit the Form: Click on the submit button to add the contact.
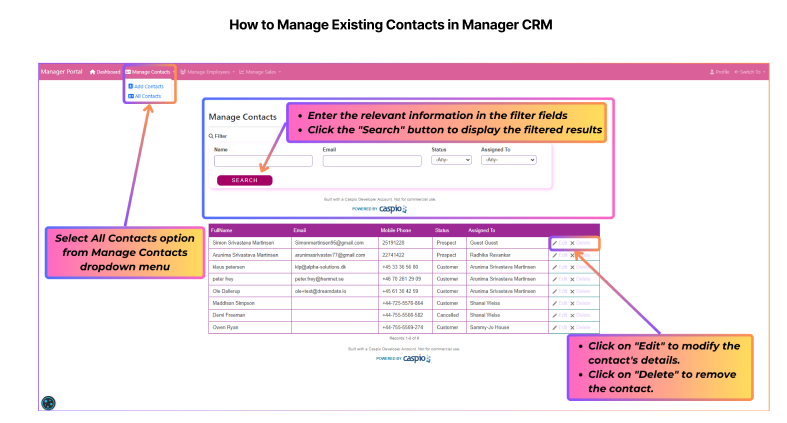
How to Manage Existing Contacts in Manager CRM
1. Access the Manage Contacts Page:
2. Viewing Contact Information: Upon entering "Manage Contacts," you'll see a list of all existing contacts within a table. The table displays key information:
3. Searching for Specific Contacts:
4. Editing or Deleting a Contact:
Manager CRM
Manage Employees
The Manage employees tab allows you to manage all the employees within the CRM System. Through this menu, you can add new employees, update existing employees information, or delete employees. It provides two main options:
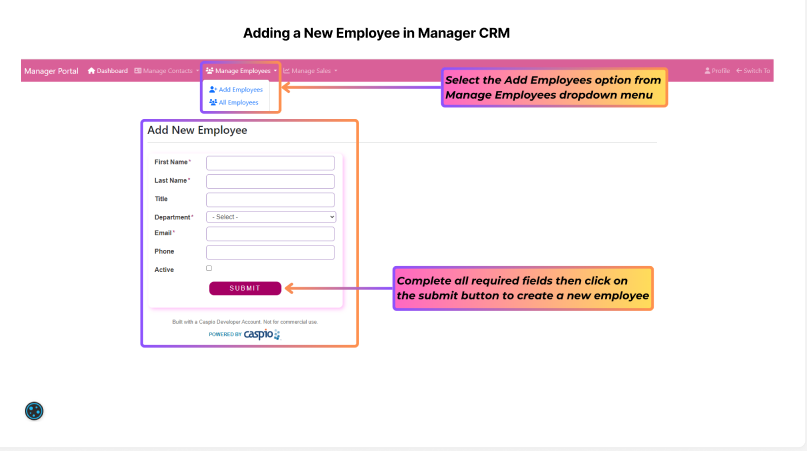
Adding a New Employee in Manager CRM
1. Navigate to Manage Employees:
2. Access the Add Employee Form:
3. Out the Employee Details:
4. Submit the Form: Click the "Submit" button located at the bottom of the form to add the employee to the CRM system.
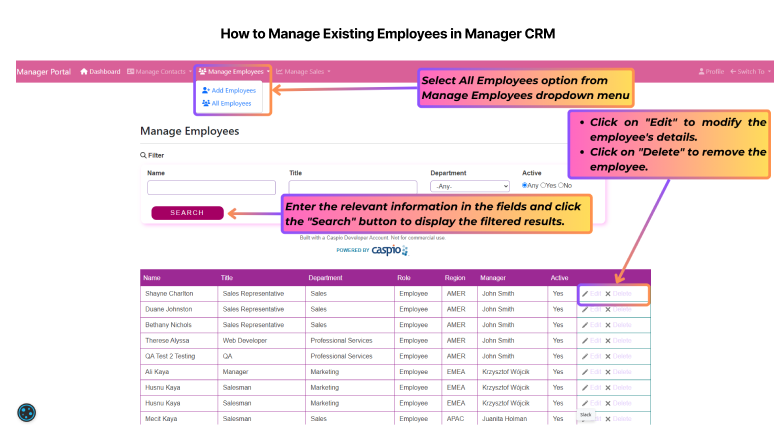
How to Manage Existing Employees in Manager CRM
1. Accessing "Manage Employees":
2. Viewing Employee Information: Upon accessing the "Manage Employees" section, you will see a table listing all existing employees. The table displays important details for each employee:
3. Searching for Specific Employees:
4. Editing or Deleting a Contact::
Manager CRM
Manage Sales
The Manage Sales module is your central hub for overseeing and streamlining your sales process.
Here's a breakdown of each tab:
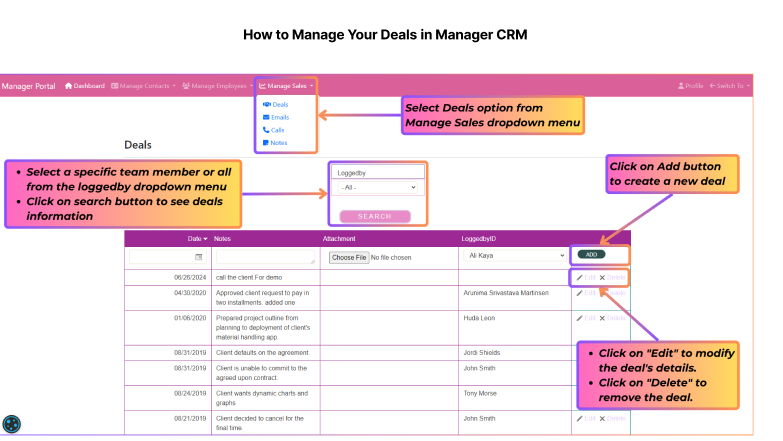
How to Manage Your Deals in Manager CRM
The Deals tab helps you track and manage your potential sales opportunities. It provides an overview of each deal's progress, value, and allows you to maintain detailed notes and attachments for each opportunity.
Here's how it works:
1. Getting to Deals: Click on the "Manage Sales" tab in the top navigation bar. Select "Deals" from the manage sales dropdown menu.
2. Viewing Your Deals: The Deals table displays a list of all your sales opportunities. Each row represents a separate deal, and the columns provide key information:
3. Filtering Your Deals: Use the "Loggedby" dropdown menu above the Deals table to filter and display deals handled by a specific team member. Select "All" to view all deals.
4. Adding a New Deal:Enter the relevant details in the empty row at the top of the table. Click the "ADD" button to create the new deal.
5. Updating an Existing Deal: To change the details of an existing deal, click the "Edit" button located at the end of the deal row.
6. Deleting an Existing Deal:To remove a deal completely, click the "Delete" button located at the end of the deal row. Confirm the deletion when prompted.
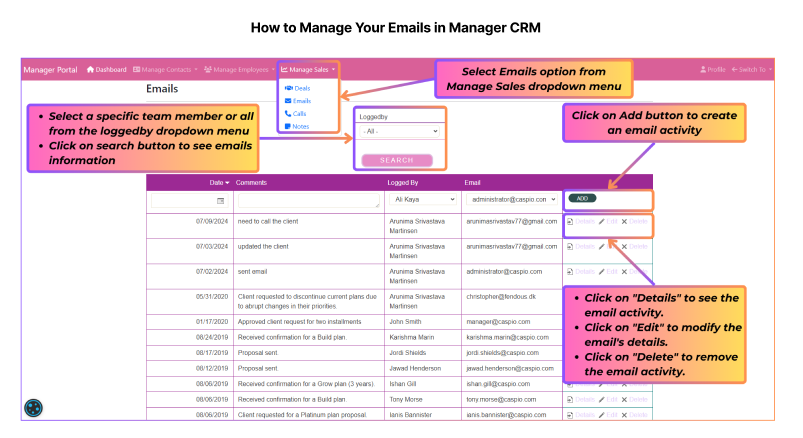
How to Manage Your Emails in Manager CRM
The Emails tab provides a record of email activities related to your sales deals.
Here's how it works:
1. Getting to Emails:Click on "Manage Sales" at the top of the page, then select "Emails" from the manage sales dropdown menu.
2. Viewing Your Emails: The Emails tab displays a table with the following columns:
3. Filtering Emails: You can use the "Loggedby" dropdown menu above the Emails table to filter and display emails activity handled by a specific team member. Select "All" to view all emails activity.
4. Adding an Email Activity:Enter the relevant details in the empty row at the top of the table. Click the "ADD" button to create the new email activity.
5. Updating an Email Activity: To change the details of an existing email activity, click the "Edit" button located at the end of the email row.
6. Deleting an Email Activity: To remove an email activity completely, click the "Delete" button located at the end of the email row. Confirm the deletion when prompted.
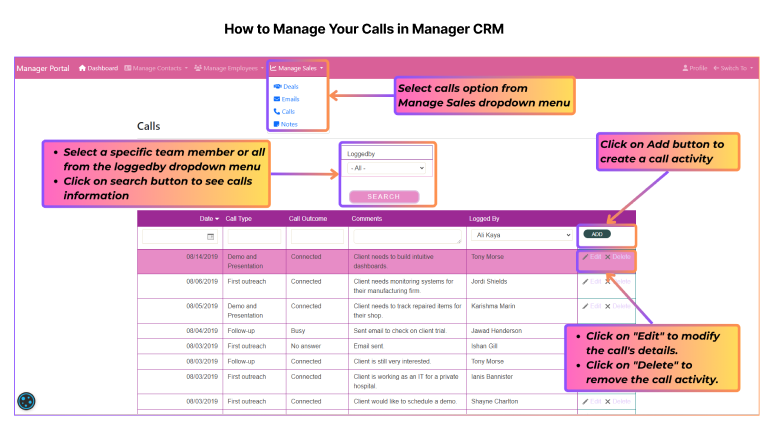
How to Manage Your Calls in Manager CRM
Manager CRM's Calls tab lets you record, track, and manage sales call details, improving follow-up and boosting sales.Here's how it works:
1. Getting to Calls: Click on "Manage Sales" at the top of the page, then select "Calls" from the dropdown menu.
2. Viewing Your Calls: You'll see a list of all your calls associated with your sales deals. Each row represents a different call activity.
3. Filtering Calls: You can use the "Loggedby" dropdown menu above the Calls table to filter and display calls activity handled by a specific team member. Select "All" to view all calls activity.
4. Adding a Call Activity:Enter the relevant details in the empty row at the top of the table. Click the "ADD" button to create the new call activity.
5. Updating a Call Activity: To change the details of an existing call activity, click the "Edit" button located at the end of the call row.
6. Deleting a Call Activity: To remove a call activity completely, click the "Delete" button located at the end of the call row. Confirm the deletion when prompted.
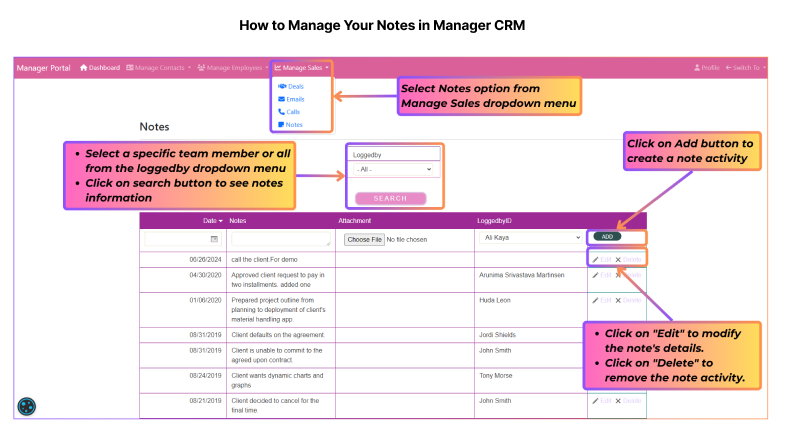
How to Manage Your Notes in Manager CRM
The Notes tab within Manager Manage Sales allows you to view, search, and manage all notes related to your sales activities.
Here's how it works:
1. Getting to Notes: Click on "Manage Sales" at the top of the page, then select "Notes" from the dropdown menu.
2. Viewing Your Notes: You'll see a list of all your notes associated with your sales deals. Each row represents a different note activity.
3. Filtering Notes: You can use the "Loggedby" dropdown menu above the Notes table to filter and display notes activity handled by a specific team member. Select "All" to view all notes activity.
4. Adding a Note Activity:Enter the relevant details in the empty row at the top of the table. Click the "ADD" button to create the new note activity.
5. Updating a Note Activity: To change the details of an existing note activity, click the "Edit" button located at the end of the note row.
6. Deleting a Note Activity: To remove a note activity completely, click the "Delete" button located at the end of the note row. Confirm the deletion when prompted.
Employee CRM
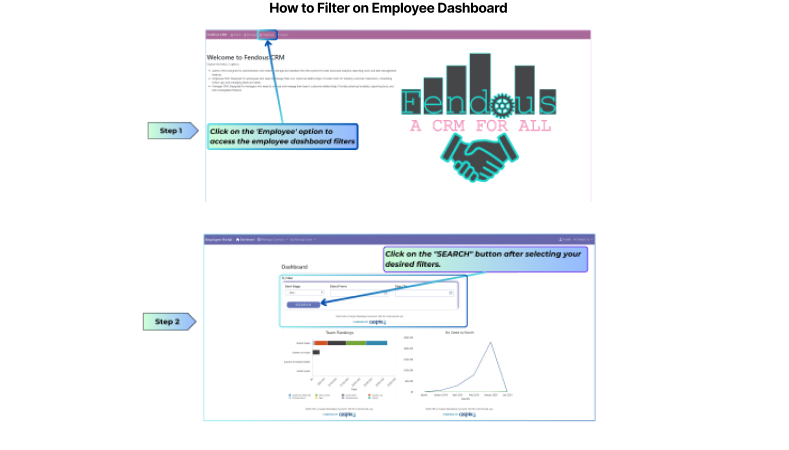
Employee Dashboard : Employee Dashboard provides a snapshot of your individual sales performance, highlighting key metrics and trends over time. Use this dashboard to track your progress, identify areas for improvement, and make data-driven decisions.
How to Filter on Employee Dashboard
The Employee CRM dashboard allows you to filter information based on Deal Stage and Date. Here's how:
Deal Stage:
Date:
Apply Filter:
Employee CRM
Manage Contacts
The "Manage Contacts" tab in the Employee CRM allows you to manage all your contact information efficiently. It acts as a centralized hub for storing and organizing details about clients, vendors, partners, or any other relevant individuals or entities you interact with.
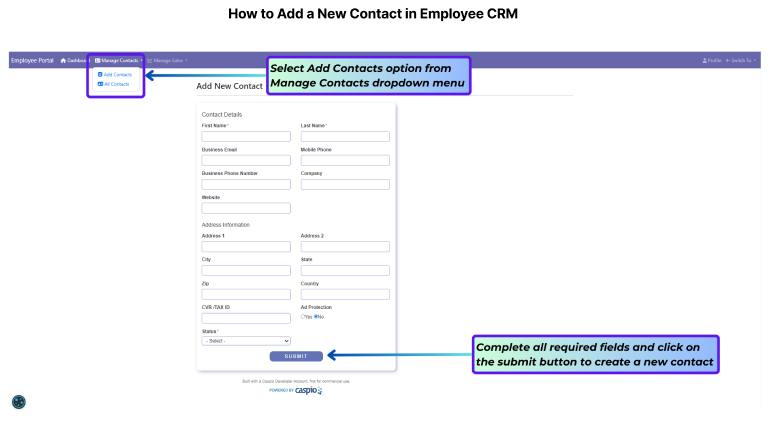
How to Add a New Contact in Employee CRM
1. Navigate to Manage Contacts:
2. Add a New Contact:
3. Fill in the Add New Contact Form: A form will appear where you need to enter the contact details:
4. Submit the Form: Click on the submit button to add the contact.
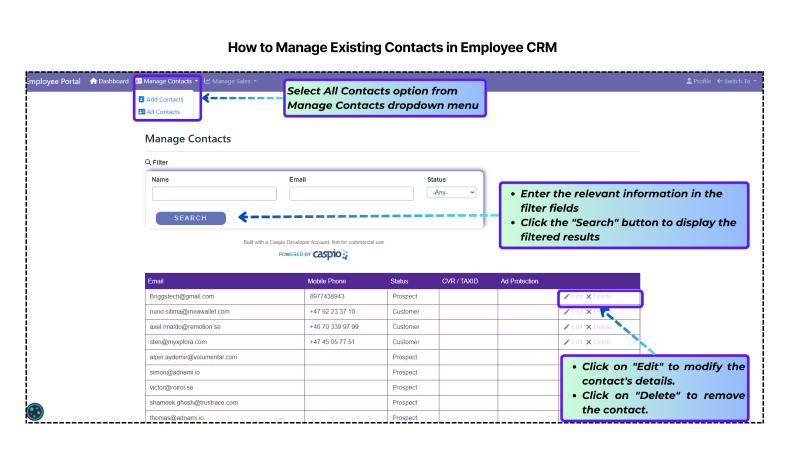
How to Manage Existing Contacts in Employee CRM
1. Access the Manage Contacts Page:
2. Viewing Contact Information: Upon entering "Manage Contacts," you'll see a list of all existing contacts within a table. The table displays the following information for each contact:
3. Searching for Specific Contacts:
Editing or Deleting a Contact:
Employee CRM
Manage Sales
This is where you control and improve your sales process. Here’s what you can do:
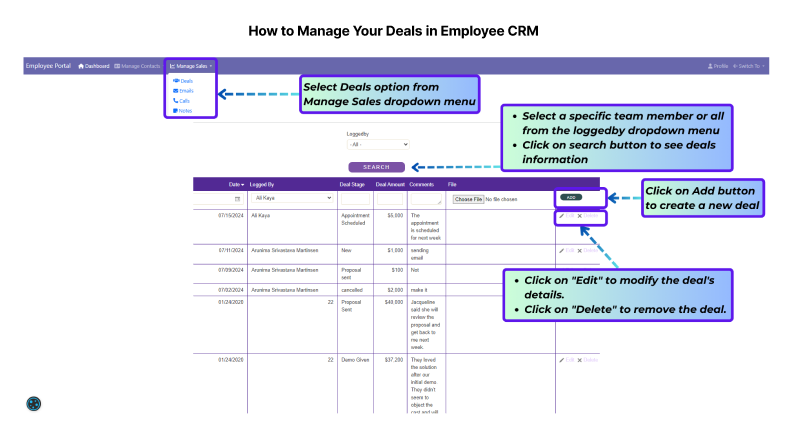
How to Manage Your Deals in Employee CRM
Deals tab provides a snapshot of all your sales opportunities. You can see the date, who logged the deal, its current stage, the potential value, and any relevant comments or attached files.
Here's how it works:
1. Getting to Deals:Click on the "Manage Sales" tab in the top navigation bar. Select "Deals" from the manage sales dropdown menu.
2. Viewing Your Deals:The Deals table displays a list of all your sales opportunities. Each row represents a separate deal, and the columns provide key information:
3. Filtering Your Deals:Use the "Loggedby" dropdown menu above the Deals table to filter and display deals managed by a specific team member. Select "All" to view all deals.
4. Adding a New Deal:Enter the relevant details in the empty row at the top of the table. Click the "ADD" button to create the new deal.
5. Updating an Existing Deal:To change the details of an existing deal, click the "Edit" button located at the end of the deal row.
6. Deleting an Existing Deal:To remove a deal completely, click the "Delete" button located at the end of the deal row. Confirm the deletion when prompted.
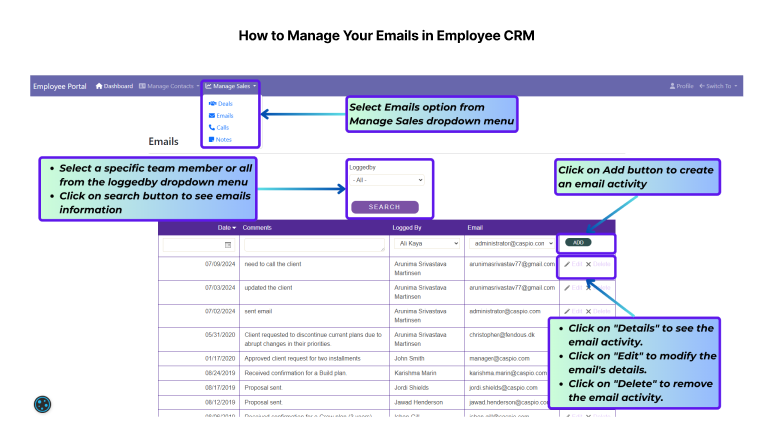
How to Manage Your Emails in Employee CRM
The Emails tab provides a record of email activities related to your sales deals.
Here's how it works:
1. Getting to Emails:Click on "Manage Sales" at the top of the page, then select "Emails" from the manage sales dropdown menu.
2. Viewing Your Emails:The Emails tab displays a table with the following columns:
3. Filtering Emails: You can use the "Loggedby" dropdown menu above the Emails table to filter and display emails activity managed by a specific team member. Select "All" to view all emails activity.
4. Adding an Email Activity:Enter the relevant details in the empty row at the top of the table. Click the "ADD" button to create the new email activity.
5. Updating an Email Activity:To change the details of an existing email activity, click the "Edit" button located at the end of the email row.
6. Deleting an Email Activity:To remove an email activity completely, click the "Delete" button located at the end of the email row. Confirm the deletion when prompted.
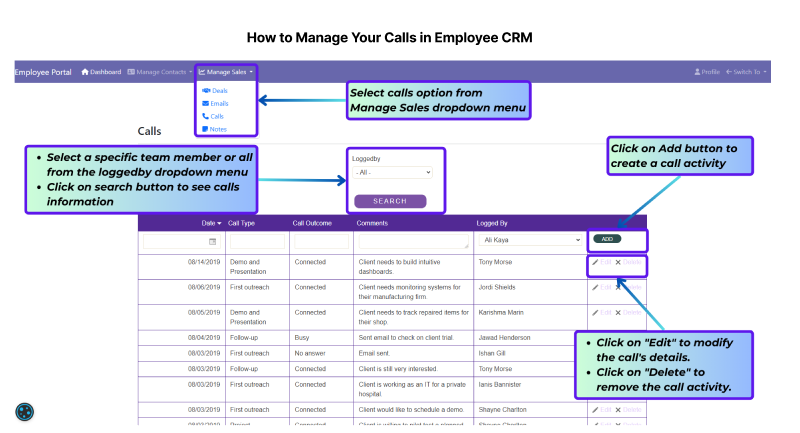
How to Manage Your Calls in Employee CRM
The Calls tab helps you keep track of all your sales calls.
Here's how it works:
1. Getting to Calls:Click on "Manage Sales" at the top of the page, then select "Calls" from the dropdown menu.
2. Viewing Your Calls: You'll see a list of all your calls associated with your sales deals. Each row represents a different call activity.
3. Filtering Calls: You can use the "Loggedby" dropdown menu above the Calls table to filter and display calls activity made by a specific team member. Select "All" to view all calls activity.
4. Adding a Call Activity:Enter the relevant details in the empty row at the top of the table. Click the "ADD" button to create the new call activity.
5. Updating a Call Activity: To change the details of an existing call activity, click the "Edit" button located at the end of the call row.
6. Deleting a Call Activity: To remove a call activity completely, click the "Delete" button located at the end of the call row. Confirm the deletion when prompted.
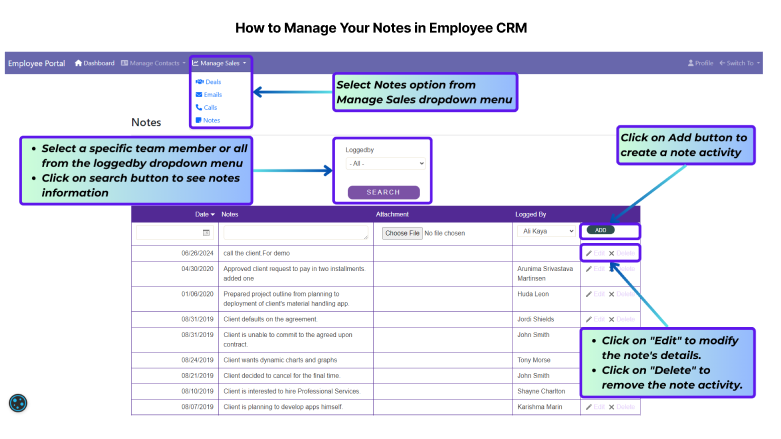
How to Manage Your Notes in Employee CRM
The Notes tab within Employee Manage Sales allows you to view, search, and manage all notes related to your sales activities.
Here's how it works:
1. Getting to Notes:Click on "Manage Sales" at the top of the page, then select "Notes" from the dropdown menu.
2. Viewing Your Notes:You'll see a list of all your notes associated with your sales deals. Each row represents a different note activity.
3. Filtering Notes: You can use the "Loggedby" dropdown menu above the Notes table to filter and display notes activity managed by a specific team member. Select "All" to view all notes activity.
4. Adding a Note Activity: Enter the relevant details in the empty row at the top of the table. Click the "ADD" button to create the new note activity.
5. Updating a Note Activity: To change the details of an existing note activity, click the "Edit" button located at the end of the note row.
6. Deleting a Note Activity: To remove a note activity completely, click the "Delete" button located at the end of the note row. Confirm the deletion when prompted.
Account Management
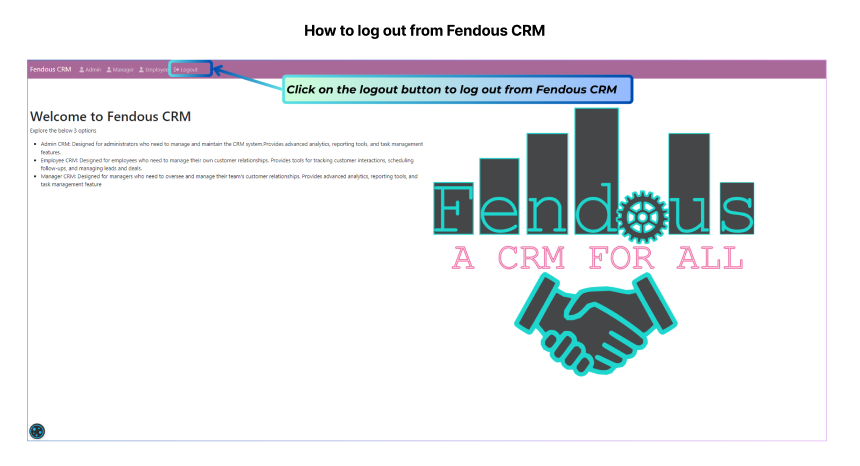
Logging Out
To ensure the security of your data and prevent unauthorized access, it's important to log out of Fendous CRM when you're finished using the system.
How to Log Out:
Locate and click on the Logout button. You'll find logout button at the top of the page. You will be redirected to the Fendous CRM home page, indicating you have successfully logged out.
Important Notes:
Remember to log out after every session, especially when using a shared or public computer. If you remain inactive on Fendous CRM for an extended period, the system may automatically log you out as a security precaution.